Showing posts with label DIY. Show all posts

Sunday, February 8, 2015

Easy Non Candy Preschool DIY Valentines

Bugga is having her preschool Valentine's Day Party later this week. Part of me was all,"This is the ULTIMATE PINTEREST OPPORTUNITY" and the rest of me was all, "I'm tired - here, these valentines in the checkout line at Target are adorable."

So I compromised. I used some of my mess-around-on-my-phone time that is part of my nightly detox with my husband as we go through the DVR after the kids are in bed to peruse Pinterest boards. I stored some ideas away in my head, then escaped off to the craft store during weekend nap time to gather the couple of supplies I needed, dedicated a little more than an hour to the design and assembly, and VOILA! Adorable valentines, sans sugary madness. (I'm sure the kids will already get plenty of sugar for their little systems during this party.)

I thought about having Bugga sign her name to the card so it wasn't Obviously Done By Mom but she is still only able to write about 65% of the letters in her name, and certainly not small enough to fit on this card. So ODBM it is.

My supplies:

  • Small bear animals
  • colorful twine
  • hot glue & gun
  • glitter valentine hearts
  • cardstock
  • inkjet printer


My result:


Sunday, July 13, 2014

Nursery Room Reveal

I recently posted the ideas I used for inspiration when putting together my second daughter's nursery. Well, here is how it all turned out!

I ended up using a turquoise, white and silver palette with a baroque/damask (uhhhhyeahhhh to be honest, I don't know the difference!) and butterfly theme (I was unable to choose one or the other so just went with BOTH!). I tried to tie in the design across the different details so it ended up flowing pretty well.

Let me give you a tour!

Starting from the left of the door I put Bella's changing table and the glider that I have had since pregnant with Bugga. The glider doesn't exactly match, but I was not about to buy another glider just to get it to match the room. I toss baby blankets on it all the time anyway. 

Do you know what drove the color? The curtains. I wanted (NEEDED) some quality blackout curtains, and I found an Etsy designer that offered an excessive amount of fabric patterns. This one I found is perfect for what I was looking for. Then, I spray-painted an IKEA mirror to match the turquoise color in the curtains. I also ordered a matching changing table cover and boppy cover from another Etsy store. In between the mirror and the curtains is my burst of butterflies. 


Here is another view that includes the boppy cover - the fabric is super soft.


And perhaps a slightly closer view of my butterfly installation. I like calling it an installation, you know, because I'm a museum-level arteest and all.

I was going for a "just released" effect and love the multiple dimensions of the butterflies since the wings come out from the wall, and they are scattered all over multiple walls and the ceiling.

Moving to the other side of the room, you can see the crib and bookshelf. This will be the second baby to sleep in this crib that I love. I continued the butterfly theme with the butterfly mobile over the crib, and the butterfly framed rhinestone piece on the bookshelf. I found some ornate frames to match the feel of the curtains and the mirror, spray-painting them to match the room, and lucked out finding drawers/doors to work with the IKEA bookshelf, as well as some turquoise toy bins. I also purchased some silver damask decals that run up the wall over the bookshelf, as well as up the wall right next to the door. I made Bugga a pink striped pillow poof so she'd have some place to sit and play while I nurse her little sister in the glider during the day when it's just the three of us at home.

Here's a closer look at the butterfly mobile I made.


And a closer (yet blurry, sorry) picture so you can see the rhinestone detail of the framed butterfly. 


Here's a straight-on view of the bookshelf and the coordinating decor. I painted the frames, and the mats, and modified some prints to fit my vision after seeing a variety all over the internet.


I forgot to take pictures of the closet and door wall, but all that's interesting from that view is the silver damask decal that is slightly different than the one over the bookshelf.

I really enjoyed decorating this room, and I truly enjoy just being in it now - it is so relaxing. I'm also proud of how everything turned out! After all is said and done, I made/customized so much of it myself:
  • the mirror
  • the butterfly installation
  • the striped pillow poof
  • the butterfly mobile
  • the frames, mats and prints
  • the butterfly framed rhinestone art

I hope to post additional details on how I made each of my crafts and will link from here as they become available. And now that we have moved 4 months into Bella's life and I've had to recreate this room in an entirely new house, I will also post updated photos on the variation of the design once I get all of it set back up (and reordered where applicable - darn non-reusable decals!). I hope you enjoyed your tour!

Also, if you want to check out Bugga's 2-year-old room, click here!

Thursday, May 8, 2014

Toddler Room Reveal!

I am finally ready to do this post!

I shared my room inspirations for Bugga's new Canadian bedroom when we moved to Calgary last summer. I worked on her room and her new little sister's nursery simultaneously but it has taken me until now to get around to taking pictures of everything (that whole giving birth thing stalled me a little bit).

A little recap of what I was working with: we are renting so although we had permission from our landlord to paint the kids' bedrooms, I ended up being too pregnant (read: tired) to bother with paint. The walls are this cream color that I would not have selected myself, but I made it work. Also, Bugga's room has somewhat of an annoying layout since the first thing you see when you enter her room are the closet doors (eh, why?), and with a window and a random corner that sticks out there really aren't a lot of options for where furniture can fit in this room. We couldn't have fit more than a twin bed in here either!

As far as designing the room goes, my focus was on modern patterns, purple/pink/gray combinations, and the alphabet. I also wanted to use as much of the space as possible, so I have things hanging from the ceiling as well as flat and three-dimensional items on the walls. I am thrilled with how it turned out, and Bugga is constantly chattering about the details.

Anyway, without further delay...

View #1: This is what you see from the door. That far wall with the closet and the window really perplexed me with how to furnish this room. I'm still not sure what the builder was thinking. Anyway...


View #1

View #2: From left to right starting at the door, I put the dresser/changing table. I ordered alphabet decals in lavender for over the changing table, framing the "S" (Bugga's first initial) to make it the focal point. This has been a great tool for teaching her the alphabet, along with a few other things we've used.

View #2

View #3 & #4: The second wall is seen in the first picture. I really wanted stripes and considered painting them. After researching various techniques, I decided the decals would be the easiest, and I ordered these off Etsy in custom lengths to fit the wall (notice the corner kick out - adds interest, but still serves no purpose). 

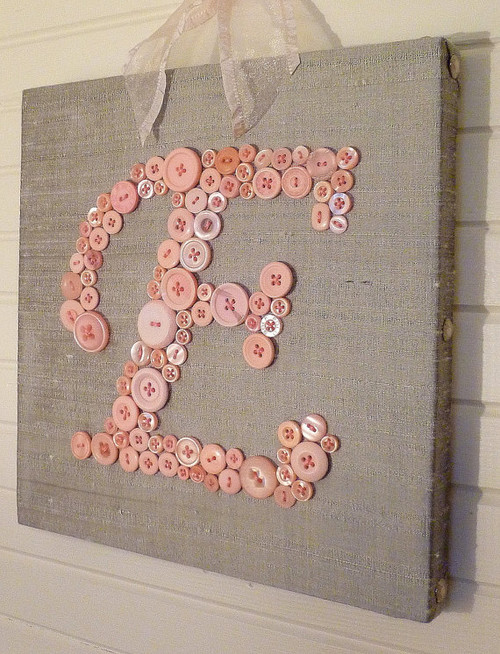
I wanted Bugga to see her name frequently, so I painted white wood letters from Michael's. For her first initial I carved it from some styrofoam, covered it in purple glitter, and edged it with purple ribbon. 

The final detail for this wall are the three felt flower balls, hung from the ceiling which give the decor some depth. They are hung in the corner so they don't hit anyone in the head.

For a reading area, I brought her Pottery Barn Kids Anywhere Chair in from another room and set it next to her bookshelf so she can cozy up with her books whenever she wants.
View #3

View #4

View #5: I ordered the lavender chevron curtains FIRST because blackout curtains are a must with napping children. They unfortunately took a lot longer than I thought they would because I messed up the order the first time, but I love how they turned out. 

I then decided to go with a twin bed with a toddler rail (versus a toddler bed) because it will be used longer. I was tempted by the toddler bed because it would have left so much more space in the room for other things, but in the end, practicality won out. And we've never had too much of a problem with Bugga's safety in this bed (now keeping her in it has had it's moments). It also has a trundle frame (still in the shipping box under the bed) that we can use later. 

I covered some purple wood stars from Michael's in purple glitter and hung these from the ceiling too. I found purple "princess" bedding, and underneath are - wait for it - Minnie Mouse sheets. Her fave.

View #5

View #6: This angle shows the canvas art I created for her room. I went into extreme detail and included some tutorials for how I made some of these here. She still points at these all the time and tells me what they are. 

Also, I used the giant "S" collage from her first birthday party for her door, and it's fun to see her baby pictures every time we enter the room.

View #6
I mentioned in my inspiration post that I had started a satin rag rug. Well, let me advise anyone out there reading this that a rag rug project is not for the remotely busy person. That thing would have taken me many, many (many) months to complete if I had pursued it. Fortunately, I quit before I had invested too much time. And now I have several yards of lavender, silver, and white satin sitting around for another project. I'm glad I used coupons when I bought all that from Joann's!


So that's it! It's pretty simple actually, and I had a lot of fun putting it together. But most importantly, Bugga loves it. That's why we go to all this trouble, right?

**Please let me know if you have any questions about where I bought something or how I made something in this post. **

Tuesday, October 8, 2013

Project: Chevron Canvas

I recently posted what I am using as inspiration for Bugga's toddler room. Since then, I have been busy with various projects, which I will start sharing with the internet world. To start things off, I am working on a set of painted canvas pieces for Bugga's wall. The first one is a Flower on a Chevron Canvas, and I love how it turned out:


Below I will share how I created the Chevron Canvas, and in a separate post I will detail how to create the flower.

Chevron Canvas


There are several ways to get a chevron pattern onto a canvas. If you can find a piece of fabric that already has the pattern on it, you can simply staple that around your canvas and be done with it. If you go the painting route (which I did), you also have to choose to use painter's tape, or freehand it. Personally, I knew I would get frustrated with the tape, so instead I used a flat-edged foam brush to make the lines straight.

Materials Needed:


  • Blank white canvas
  • Acrylic Paint in desired colors
  • Pencil with white eraser
  • Ruler
Instructions:
  1. Determine how wide you want your stripes to be, and balance that with the dimensions of your canvas. For example, I wanted 1" wide stripes. My canvas was 12"x12" so it was pretty straightforward.
  2. Measure along each side of the canvas, making marks for the width of your stripes. Make your pencil marks lightly so that they can be erased as needed later. Then connect your marks across to the opposite side of the canvas, resulting in a checkerboard pattern.
  3. Connect the corners of the checkerboard squares to create your chevron pattern. Erase the pencil marks within the chevron stripes as well as possible.
  4. Paint your stripes. The foam brush with the flat edge will make it easier to create a sharp line. If you are using more than one color, I recommend painting with one at a time, letting the paint dry between colors. **There is a chance you might run into the same problem I did: I wasn't planning on painting the white stripes, but my pencil marks were stubborn, so I had to do some white paint touch-ups.**


Now add a gorgeous flower to your canvas!

Also, see the full set of DIY canvas art I made for my toddler's new room!

Project: Felt Flower on Canvas

If you have seen my inspiration page for my daughter's toddler room, you can see I am very much into the chevron pattern right now. I've seen some beautiful felt flowers on chevron canvas on Pinterest and Etsy, and I thought it looked like something I could make myself. So I did, and it turned out great!

What I had to do though is come up with the how-to part myself, as I could not find anyone else's instructions ANYWHERE. So...here are very detailed instructions on how to create a felt flower to be displayed on canvas.


Felt Flower on Canvas


Materials:
  • Canvas for mounting (see instructions here for a Chevron Canvas, Striped Canvas, and a Polka Dot Canvas)
  • Felt in color of choice
  • Hot glue gun
  • Scissors
  • Paper
  • Pencil
Instructions:

1. Create a template for the flower petals using a sheet of paper and pencil. For my design, I used a template shaped like a house, in three different sizes. (Click here for the template .pdf.)

2. Cut the templates out, and trace the templates onto your felt using a pencil. The mark of the pencil is likely to not be so dark on this type of material, but the scrape will leave a mark on the felt that will be easily noticeable as you are cutting out the petals. I cut out 10 petals of the largest size, 19 of the next size down, and 9 petals of the smallest size.

3. First I hot glued the 10 largest petals. I put some glue at the bottom center of each piece and folded it in half.

4. Once dry (doesn't take long - by the time you finish #10, #1 will be dry), pinch the spot where you put the glue, and fold back the outside edges of the petal. Hot glue the two edges of the other side of the petal to glue the petal to the canvas.

5. Glue 5 of the largest size petals onto your canvas in the pattern shown below.

6. Glue the other 5 of the remaining largest petals onto the canvas in between each of the first five petals.

7. Glue the 19 petals of the middle size the same way as in step #3, and then also pinch the glued spot, peel back the folded petal, and turn over, gluing the two outside edges of the petal.

8. Glue 7 of the middle size petals onto your flower, placing them closer into the center of the canvas as shown.

9. Glue another 7 between each of the first 7 middle size petals as shown below.

10. For the remaining 5 middle size petals, glue them down the same way, but upside down, and slightly closer into the center of the canvas. This will create a bit of a three-dimensional look that will help support the center of the flower.

11. For the smallest size petals, glue 5 of them like you did the larger sizes. Then place them even further in than the previous rows upside down, in between the lower petals where possible.


12. You will use the 4 remaining petals for the center of the flower. Fold two of the four petals and glue like the larger sizes. Snip a lower corner off of one of these two petals as shown in the picture.


13. Wrap the non-snipped glued petal around the snipped glued petal. Glue at the bottom.


14. Wrap the third petal around the two glued petals. Glue at the bottom.


15. Wrap the fourth petal around the three other petals. Glue at the bottom. Then glue the petal bunch into the center of the flower and you are done!


Let me know how yours turned out!

Can't get enough canvas art? Here are some others I just finished.

Project: Canvas Wall Display

I am making some pretty decent progress on Bugga's Toddler Room! (Check out where I started for her room inspiration.) I am very excited with each component I have completed so far. Today, I'm going to give a sneak-peek on the Canvas Art I will be displaying on one of her walls.

Here it is!

I painted four 12"x12" canvases in the room's main colors, and then decorated accordingly:

1.) A rhinestone monogram on white & purple stripes
3.) A pink felt Minnie Mouse (Bugga's a TAD obsessed with Minnie Mouse) head on purple with white polka dots
4.) A rhinestone star (after all, Bugga loves stars AND was born in Texas!) on white & purple stripes

I'm hoping to hang them this weekend, and then I can figure out where I want to hang the flower balls I made to match!

Friday, September 6, 2013

Magnetic Board Options

After my recent project creating Fabric Alphabet Magnets for my daughter, I of course needed to find a magnetic space for her to use her new magnets.

I saw this great idea on Pinterest to use an inexpensive oil drip pan that can be purchased for a low price at a local Home Depot or Lowe's. Perfect.

Except apparently in Canada they don't believe in these particular style of oil drip pans, so I hit a dead end immediately.

Then I thought, well, I'll just get a board cut to my specifications, and then use a couple various products on the market (specifically Chalk Board Paint and Magnetic Paint) and make my daughter her own customized chalkboard-magnet-board combo space. Genius.

Thankfully I did a little online researching before investing in any of the supplies needed. I found this and this which taught me two things: 1) There is a certain guy posting on every internet thread about his magnetic paint additive that is overall a pretty grouchy guy, and 2) Magnetic paint is a waste of time and energy.

OK so now what? I could buy a kid-specific magnetic board, but I really wanted something BIG and most kid magnetic boards I could find are somewhat teeny.

In the end, I went with a magnetic dry erase board (Michael's, ~$20). I will be no means be giving my 21-month-old dry erase markers anytime soon, but it works great as a clean magnetic space for her new magnets, and down the road she'll have fun with the markers.

Friday, August 23, 2013

Toddler Bedroom Inspiration

Since we have moved to Calgary, I now have a blank slate for both Bugga's room, and the nursery for Baby #2. I plan to document both, but I won't post the nursery details until the baby is here since my friends and family don't know the gender yet!

For Bugga's room, I want to incorporate some trendy patterns, and add in little themes here and there of things that she likes. Also, we are putting a lot of emphasis on learning the alphabet lately, so I wanted to add letter details throughout the design. 

The catches to the room:

  1. We are renting. We have permission to paint the rooms, but everything has to be within "reason". Ha.
  2. Bugga will be in this room from age 1.5 - 5.5, so the plus here is I don't have to think too far ahead and not make it too "young" since we'll move after that and have a whole new clean slate to work with.
As I'm putting things together, I will post any DIYs or progress. Until then, here are some design inspiration ideas!

Color Pallette:

A lilac/lavender color, with silver/gray and white as the neutral base. I might throw in another miscellaneous pop of something like baby pink or lime green depending on what the decor calls for.


Wall design:
 
I am currently obsessed with stripes. And the idea of the gray and white is a nice neutral that will be great with a pop of color on top of it. I also like the concept of a solid wall painted in the color of the darker stripe. Not sure if I have the patience to paint the stripes though, so I might go the decal route.

Wall decor/curtains:


Some obvious points to note: There will be chevron. This is definite. I need to put an alphabet somewhere around the top of the room, and/or in a frame. I love the chevron canvas idea with color pops on top that tie to the theme. I also love the silhouettes and need to find a way to fit those in - perhaps sticking to something Minnie Mouse or flower related (Bugga's faves). Oh and glitter. If I can incorporate glitter into this effort, this is something I must do.

Furniture/Accessories:


I will need to transition Bugga to a "big kid bed" before the baby arrives in December to prevent the need for two cribs. This is currently freaking me out because a) she sleeps pretty darn well in her crib so why mess with something that isn't broken, and b) a big kid bed means she is growing up and I'm just not ready for this! I would love to get her a beautiful white canopy bed but I'm not sure her teeny 11'x11' room will allow for this. But I'll try to keep inspired by the concept at least. A trundle bed would be great too, then if we have problems with the twin bed transition, and a toddler rail doesn't work (crossing fingers once we get there), then a lower trundle mattress might prevent too many major crashes. And it would be good for sleepovers down the road.

I found the link above for a DIY rag rug that I think would look beautiful in Bugga's room. In fact, I've already started it with lavender, silver, and white satin fabric. The thing is, I'm pretty sure this project is going to take the rest. of. my. life. No joke.

I would love a reading nook/area in her room if there is space, but not sure it will happen. Oh, and the Minnie Mouse sheet options out in the world are for the most part pretty tacky, but a set of these sheets or something similar (subtle-style) would be a nice surprise under a purple comforter. We'll see if I can track any down as these appear to be previous year's style.

And the design process is ON! Please check back as I post progress!